 Mexican Peso
Todas las categorías
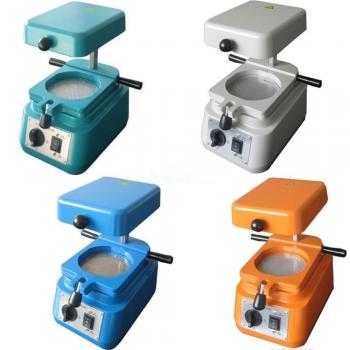
Ultravac ™ Termoformadora para odontología in 1082 para Laboratorio Dental

Descripción Del Producto
Comentarios de Producto
-
Ultravac ™ Termoformadora para odontología in 1082 para Laboratorio Dental
Description & Indications:
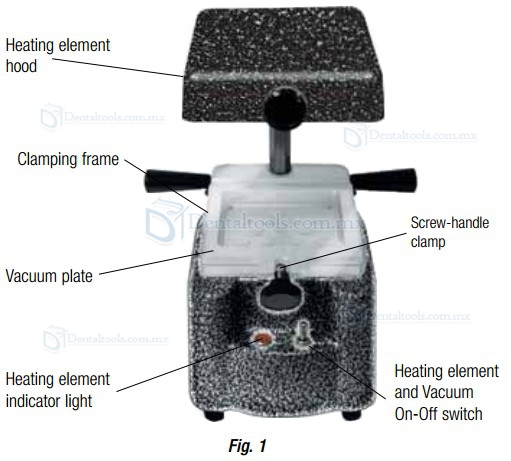
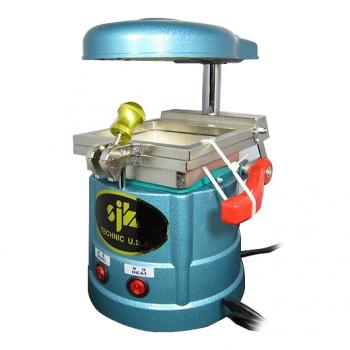
The UltraVac™ vacuum former is a light-weight version of the Ultra-Form. The UltraVac utilizes a single, threeposition toggle switch operation system that activates the unit’s heating element and vacuum pump and also turns the unit off. An indicator light on the UltraVac’s base warns the operator when the heating element is activated and ready for operation.
Operating Instructions (Read before operating):
Prior to plugging in the UltraVac become familiar with the unit’s features and operating functions. It is equipped with non-stick vacuum plates and smooth-glide clamping frame systems (Fig. 1).
1. Before operation, make sure the clamping frame opens, closes and locks easily into place using the screw-handle clamp. Attach the two black handles into the clamping frame. Check the slide operation by moving the clamping frame into the up, Heat position.
2. Plug the unit into a standard grounded outlet (U.S., 10 amps, 120 volts; Europe, 5 amps, 240 volts).
3. Place the switch in the Heat position. Make sure heating element activates and the indicator light activates. Rotate heating element hood to either side before placing plastic tray sheet in clamping frame.
4. Next, move the toggle switch to the Vacuum position to ensure that the vacuum pump functions properly.
Note: Smoking from the heating element may occur with the first use due to oil on the heating element. If the UltraVac unit does not function properly, call 1-800-552-5512 (in the U.S.) or your respective distributor (outside the U.S.) for assistance. Your vacuum former is now ready for use.
Please read the following instructions before operating.
Important Note: Never leave the Ultra-Form or UltraVac unit unattended when on. DO NOT attempt to deactivate or alter product safety features. The unit could be damaged and/or cause fire if unattended while heating element is on.
Operate in a clean, uncluttered area. Keep all combustibles away from unit. Use caution as heating element hood becomes hot, especially after repeated use.General Use Procedure:
1. Insert selected sheet resin material into the clamping frame. The S or screw-handle clamps allow adjustment of the frame according to the thickness of the material used. For most materials, spray model and plate with Ultrasep™ III silicone lubricant.
2. Place model or cast on vacuum plate. Instructions for various applications are outlined below.
3. Slide clamping frame upward until it locks into position. Turn main switch on. Allow appropriate time (usually 2-4 minutes) for the material to heat sufficiently
to achieve optimal sag for vacuum forming. We recommend approximately 2.5 inches (6.5cm) for the 0.035” Sof-Tray® bleaching material (Fig. 3). Most other materials are heated until they sag 0.5-1 inch. Milky, semi-transparent coping material should be formed when it becomes clear and barely begins to sag.
Experience helps in knowing optimum point of sag for the various plastic materials used. Thinner materials such as coping, splint, and 0.040” mouthguards do not require the same amount of sag as thicker materials (see individual material instructions below).
4. When the desired sag has been achieved, lower the clamping frame over the model. Activate the vacuum. A smooth, controlled lowering is recommended for thin materials.
5. Run vacuum motor for 10-20 seconds for thin plastics and 20-40 seconds for thick materials to ensure adaptation. Turn off main switch. Allow material to cool until it is comfortable enough to handle.Miscellaneous Application Procedures
A. Opalescence® Tooth Whitening Appliances:
1. The stone model should be carefully trimmed through the palate (Fig. 2). Proper trimming will prevent rocking or movement of the model on the plate. Trim the base as close as possible to 90° to the average long axis of the teeth to minimize undercuts that may potentiate folds in the plastic
upon forming. After model is dry, apply and cure Ultradent® LC Block-Out Resin to create reservoirs.
2. Insert a 0.035” Sof-Tray sheet into the plastic clamping frame. Sof-Tray sheets are ideal since they are thin, tough and soft. Lock the Sof-Tray sheet into position using the S or single-handle clamps.
3. Place stone model on vacuum plate. Although not mandatory, spraying model and plate with a layer Ultrasep III (silicone) will aid in separating the model from the form. Slide the clamping frame all the way up to the locked position and the turn switch on. The heating element will activate and begin to soften the Sof-Tray sheet. Allow 2-3 minutes to achieve optimum sag (~2.5 inches or
6.5cm, Fig. 3). This amount of heating facilitates
a thinner bleaching tray.
4. When the material has sagged enough, lower the plastic clamping frame over the model in a smooth, controlled manner. Maintain vacuum for 10-20 seconds.

After material is sufficiently cooled, remove model and plastic from vacuum plate. When plastic is completely cooled, carefully extract the model from the Sof-Tray material. (It is possible to cool model and plastic form under running tap water for more rapid cooling).
Note: Distortion may occur more easily if form is too warm.
5. Cut excess bulk of resin material away with Ultradent® Utility Cutters (serrated plastic trimmers, Fig. 4).
6. With Ultradent’s spring-action Ultra-Trim™ scalloping scissors (small tactile scissors), carefully and precisely trim tray just shy of gingival margin
(0.25-0.33mm). Take care to scallop around interdental papilla (Fig. 5). Because of the unique Sof-Tray material and the superior action of the UltraVac, the contrast afforded where the LC Block-Out resin stops (about 1.5mm shy of gingival margin) defines the gingival margin readily by a shiny line where it makes a reverse curve into the gingival sulcus on the stone model.
7. Return tray to model and check tray extensions. Adjust Blazer® Micro Torch to low setting. Gently flame polish edges one quadrant at a time (Fig. 6). Immediately following flame polishing of each quadrant, while plastic is still warm, readapt tray if necessary by stretching out warm material with finger. Hold periphery of each segment firmly against the model with wet finger until plastic has cooled (Fig. 7).
B. Base Plates:Quickly fabricate durable, well-adapted base plates. Use Ultradent® Laboratory Block-Out Putty when undercuts require it. If model is not completely edentulous, use block-out to cover lingual and labial surfaces of remaining teeth. Heat until plastic sags about 1 inch, vacuum adapt, and maintain vacuum for 20 seconds for this medium thickness material. Trim and polish periphery as usual.Note: An SH bur or acrylic trimming bur, a larger edge cutting disc, a separating disc or heavy shears work well for gross removal and/or shaping to desired periphery.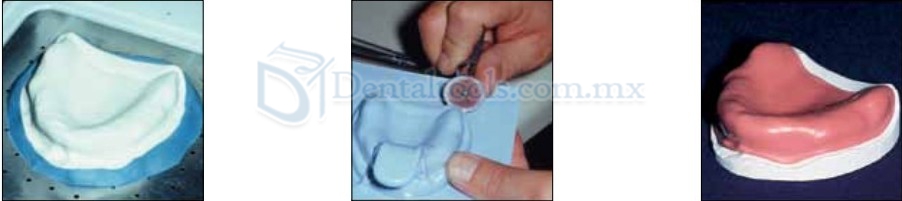 C. Blue Trays:Following cast preparation, sheets can be readily adapted. If relief is needed, an appropriate thickness of wet paper towels is placed. Ultradent Block-Out Putty easily eliminates unwanted undercuts. Handles are fabricated as shown below, or a cold-cure acrylic handle can be fabricated. Heat until plastic sags about 1 inch, vacuum adapt, and maintain vacuum for 20-40 seconds to cool this thick plastic material. Trim periphery, then perforate or paint with adhesive as needed.
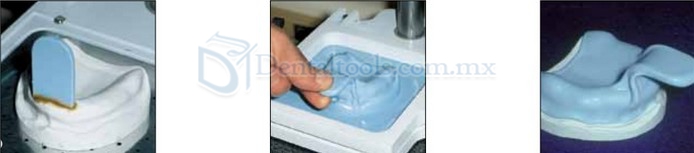 D. Clear Temporary Splints:For plastic temporary fabrication we recommend Ultradent Clear Temporary Splint Sheets, or some prefer Ultradent’s Polypropylene Coping Sheets. Denture teeth set with Laboratory Block-Out Putty readily facilitate fabrication of temporary bridges as shown below. Spray model and plate with Ultrasep III. These materials will ripple and wave when heated. When tray becomes flat and sags 0.5-1 inch, wait 10-15 seconds and form as usual. Maintain vacuum following adaptation for 10-15 seconds on this thin material. Remove from model and trim to desired extensions with Ultradent Utility Cutters. Single-unit, quadrant, or full-arch temporary fabrication splints may be constructed as desired. Cold-cured or light-cured temporary resin of choice, depending on technique, can be used intraorally or as a preliminary incomplete temporary on model. Peel splint from temporary when resin has cured. This plastic sheet material does not bond with materials like acrylic as the “clear treatment” tray sheets do. Both temporary splint sheets and coping sheets are hydroscopic (they absorb moisture from the air). If enough moisture is absorbed, bubbles may appear in the material during forming. Keep material stored in a bag with a dry gel pack to help prevent this.Note: Temporary splint material may smoke or smell while heating. It is necessary to provide adequate ventilation while adapting this material.
 E. Clear Treatment Splints:For nightguards (heavy), space maintainers (medium), or surgical trays (medium), we recommend Ultradent Clear Treatment Splint Sheets. Block out labial and lingual surfaces of teeth to just below where tray periphery will end as shown below with Laboratory Block-Out Putty.For bite opening, cold-cured acrylic mat should be added to the strong thermo-formed base to achieve desired opening and occlusal relationships. Spray model and plate with Ultrasep III. Heat until plastic sags 0.5-1 inch, vacuum adapt, and maintain vacuum following adaptation for 10-15 seconds on this thin material. Remove from model and trim to desired extensions with Ultradent Utility Cutters. Trim and polish as usual.Note: Clear surgical trays are protected by a protective masking, which should be removed before use.
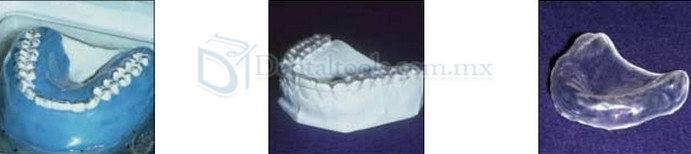 F. Soft Nightguards, bleaching, fluoride treatment trays, etc.:This is one of the easiest trays to fabricate. No major block-out is required. (LC Block-Out is recommended to construct bleaching tray reservoirs for Opalescence bleaching trays.) To facilitate removal of tray from model, a silicone lubricant (Ultrasep III) is beneficial. Lightly spray model and vacuum former table with lubricant. Heat until plastic sags 1 inch (we recommend allowing 0.035” material to sag 2.5 to 3 inches for facilitate thinning of bleaching trays). Vacuum adapt, maintaining vacuum for 10-20 seconds to ensure adaptation, and trim to desired periphery (note page 2 for construction of Opalescence bleaching trays).For nightguards (medium and heavy) one may wish to adjust occlusion intraorally. This material is best finished on periphery with a coarse Robinson Wheel brush at moderate to high RPM, followed by flame polishing with the Blazer Micro Torch. Do not scallop Sof-Tray sheets when used for nightguards. Application must include a large enough portion of the arch so the patient will not swallow it.Note: The Opalescence bleaching tray may also be used for Flor-Opal® or UltraEZ®. Their viscosity and adhesive properties keep the minimally extended thin tray in place. Conventional lower-viscosity fluoride gels require a thicker (medium) tray material, and periphery should extend 2-3 mm onto gingiva.G. Mouthguard Sheets (0.150”):Public awareness on the importance of sports mouthguards is high. A superior, highly utilized, custom-fitted guard is easily formed in-office. Trim cast to minimum vertical height. Spray vacuum plate, hinged frame, and model with Ultrasep III. Heat desired guard material until it sags 0.5-1 inch and vacuum adapt. Allow formed guard to cool 30-40 seconds with vacuum running. Remove and cool (with guard still on model) under cool tap water. Separate and trim guard to desired extensions with Ultradent Utility Cutters. Shape and smooth with coarse acrylic bur. Flame polish with the Blazer Micro Torch. If opposing occlusal intercuspation is desired, mount in articulator with opposing model. Lubricate opposing dentition. Heat occlusal surface of guard with torch until plastic softens. Press opposite model into warm plastic. Hold until cool. Maintain adequate thickness of plastic for interocclusal protection.Important Note: In all cases, and for all types of plastic-forming sheets, lingual adapting is afforded by reducing vertical height of model as much as possible, even grinding through palate where feasible.Note: Mouthguard material does NOT contain latex.Note: For more complete instructions, a well-written article titled “Fabrication of Personalized Custom Mouthguards for Athletes in Contact Sports” can befound in Laboratory Trend and Techniques, Oct. 1985, page 10.

Líder en productos odontologicos y equipos dentales profesionales para la práctica Odontológica y de laboratorio - Dentaltools.com.mx!
Anterior:Maquina Termoformadora Laboratorio dental USA
Siguiente:JT® Máquina Termoconformadoras Modelos Dentales JT-018 -
- Ningún usuario reseña todavía
Productos relacionados


Noticias Dental
- 02/11 - Anuncio de las vacaciones de...
- 11/01 - ¿ Cómo esterilizar la Fresa ...
- 12/15 - ¿CUÁL ES LA MEJOR TURBINAS D...
- 11/23 - Principios de la Fotopolimer...
- 10/28 - SISTEMA ROTATORIO EN ENDODO...
- 09/14 - ¿Cuál es la definición de au...
- 09/06 - Los Compresores para Dentist...
- 08/29 - La familia de piezas de mano...


